
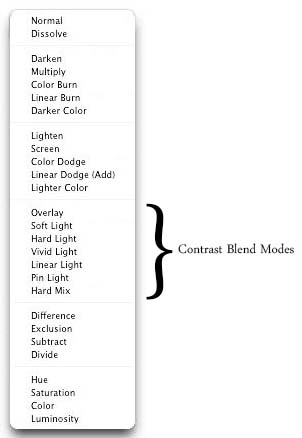
So far we have covered the first four blend modes listed in the contrast category. In this tutorial, we will learn about the next blending mode, Linear light.
Linear light works almost exactly like the vivid light blending mode that we covered in our previous tutorial which makes it the fourth blend mode in the contrast category which pretty much leaves the same impact on an image. As we have already learnt, when you apply either of soft light, hard light, vivid light or linear light blend modes, you can expect the lighter parts of your image to get even lighter and darker colors to get even darker, depending on the brightness of the blend layer. What makes linear light blending mode different is that it lightens or darkens by increasing or decreasing brightness instead of contrast. If the blend color is more than the 50% brightness, the image is lightened by increasing the brightness. In the same manner, if the blend color is less than 50% brightness, the image is darkened by reducing the brightness. Common thing among all these four blend modes is that 50% grey has no effect on the image.
Per Photoshop help site, “Linear Light burns or dodges the colors by decreasing or increasing the brightness, depending on the blend color. If the blend color (light source) is lighter than 50% gray, the image is lightened by increasing the brightness. If the blend color is darker than 50% gray, the image is darkened by decreasing the brightness.”
We will use the following two images for better understanding. First one is a simple photograph that I clicked using my Nikon D7000. Other one is a Black and White gradient, far left of which is pure black, transitioning from black to white towards left; far left is pure white.

Image 1

Image 2
I have both these documents open in Photoshop, my image as the background layer and gradient on Layer 1. As I mentioned that all these four blend modes pretty much leave the same impact on an image, I changed the blend modes to all four and here are the results for quick comparison.

After applying soft light blending mode

After applying the hard light blending mode

After applying vivid light blending mode

After applying linear light blending mode
Notice that how with each of the blend modes, the intensity of the impact on our images increases. Soft light has the least impact and with each mode change, the image keeps getting even darker on the left and lighter on the right. Another thing to notice here is that with the vivid light blend mode, there is a clear boost in increase which again is lost as we change the mode to Linear light.
Like vivid light, even linear light blending mode is one of the rarely used modes. It can sometimes be used for tonal and color corrections but the result is often so intense that you will have to reduce the Opacity of the blend layer to get the desired result and even then the impact can be harsh. It can also be used to add a boost of color into images where there is little contrast.
That is all we really need to know about the linear light blending mode. In the next tutorial, we will move on to Pin Light blending mode.